Planning Your Training Program
In preparing for a multi-day ride, it is critical that you train at the appropriate level for you. It should be challenging and geared toward improvement, but not overwhelming, considering your current fitness level and your personal cycling history. Often, cyclists preparing for a tour will try to cram in too much training, at too high an intensity. Regardless of how many weeks you have before the Ride, it is best to spend the time training at a level that is appropriate for you and improve from that starting point.
Map Out a Plan
Planning your goals, training objectives, training program and particular rides and routes takes very little time and is extremely valuable as your ride approaches. Take some time to think about your goals for your training, including which route you are training to ride on the Israel Ride. Think about when you can make time to ride, where you can ride, who you might ride with, etc. Make sure the goals are achievable and monitor them weekly. It can be helpful to break larger goals into smaller, more specific objectives that have a time goal attached to them. These goals can change, but it helps to commit them to paper.
Tune Up Your Bike
Before hopping on your bike for the season, make sure it is in good working order. It’s a good idea to take it to a bike shop and get it tuned up. Plan for another tune-up about 1 to 2 weeks before your big Ride. (Make sure you have the right bike size for your needs! View Bike Sizing Charts below.)
Outfit Your Bike and Yourself
Make sure that in addition to having a working bike, you have the proper tools (view GEAR & CLOTHING tab), spare tubes, and snacks that you need. Early in the season, it can be cold, so it’s important to dress appropriately for riding. Because weather changes, it helps to dress in layers or wear detachable arm and leg warmers which can be removed more easily than a jacket and pants (and take less storage room).
Warm-Up and Stretching
To avoid injury, it is important to let your body get warmed up as you start your ride. Do an easy lap first, or a slow jog for at least 3 minutes before a ride. Then stretch. This will enhance your circulation and prepare your body for physical exertion. Stretch before, during and after each ride. If you keep your muscles warmed-up and flexible, you are much less likely to feel sore the next day. While riding, every 30 minutes stand on the pedals, arch your back and stretch your legs. On a road bike, you can also vary your riding position by moving your hands from on top of the handlebar to the brake lever hoods or drops to prevent muscle fatigue.
What’s the right hybrid bike size for me?
| Rider Height | Suggested Hybrid Frame Size | |||
|---|---|---|---|---|
| Feet & Inches | Centimetres | Frame Size (inches) | Frame Size (cm) | Frame Size |
| 4’10” – 5’2″ | 148cm – 158cm | 13″ – 14″ | 33 – 37 | View all X-Small bikes |
| 5’2″” – 5’6″” | 158cm – 168cm | 15″ – 16″ | 38 – 42 | View all Small bikes |
| 5’6″ – 5′ 10″ | 168cm – 178cm | 17″ – 18″ | 43 – 47 | View all Medium bikes |
| 5’10” – 6’1″ | 178cm – 185cm | 19″ – 20″ | 48 – 52 | View all Large bikes |
| 6’1″ – 6’4″ | 185cm – 193cm | 21″ – 22″ | 53 – 57 | View all X-Large bikes |
| 6’4″ – 6’6″ | 193cm – 198cm | 23″ – 24″ | 58 – 61 | View all XX-Large bikes |
What’s the right road bike size for me?
| Height (inches) | Height (cm) | Frame Size (cm) |
|---|---|---|
| 4’10” – 5’3″ | 148 – 160 | 46-50 (Extra Small) |
| 5’3″ – 5’5″ | 160 – 165 | 50 – 52 (Small) |
| 5’5″ – 5’7″ | 160 – 165 | 52 – 54 (Small – Medium) |
| 5’7″ – 5’9″ | 170 – 175 | 54 – 56 (Medium) |
| 5’9″ – 5’11” | 175 – 180 | 56 – 58 (Medium – Large) |
| 5’11” – 6’2″ | 180 – 188 | 58 – 60 (Large) |
| 6’2″ – 6’5″ | 188 – 196 | 60 – 62 (Extra Large) |
Your Training Regimen
Setting a Goal
You should pace yourself according to your end goal. If working towards riding in a large ride, like the Israel Ride, you should aim to ride 75% of your longest distance at a comfortable pace at least once beforehand. If you are training towards a multi-day ride, you should also train towards cycling for consecutive days. For example, if you are training for the Chalutzim Route(the more demanding route on the Israel Ride), where the route may include is a 90 mile day followed by a 60 mile day, you should be comfortable riding about 75 miles followed by about 45 miles, For the Shomrim route on the Israel Ride, the longest days are about 35 – 40 miles, so doing consecutive day training rides of 25 – 30 miles is an train excellent training goal. You should work towards riding significant distances multiple times a week. As you train, keep in mind that there are regular rest stops throughout the Israel Ride. You will generally take a break, off your bike, at least every 15 – 20 miles. Optional pit stops will generally be more frequent,
Keep a Training Journal
Cycling training is intended to prepare you for a particular ride or series of rides by building up your endurance, cycling muscles, cycling intuition (e.g. how to ride safely on the road) and the joy of riding your bike. Keeping a training journal enables you to track your progress throughout your personal training program. Such a program can last for as little as 8 weeks to almost half of a year depending on what your goals are.
Develop Your Routine
Take it slowly and build up your ability over time. Ride or exercise at least two or three times a week, and gradually increase length and intensity. Try to do one long ride (as defined by your goals) every week. That one long ride should be 50% of your weekly total, and should increase by about 10% each week. This rate will ensure that you build your muscle strength and cardiovascular endurance gradually. By 6 to 8 weeks before the event, you should be riding three times a week, even if it is for only 30 minutes at a time. Riding 45 minutes a few times a week is much better than two to three hours all at once. If you can’t get out on your bike, indoor spin classes can also be an excellent part of your training routine. Try to get a short, but intense ride in before or after work. Consistency is paramount for training.
Vary Your Rides
You will be better off if you have trained to tackle both distance and hills. Alternate between shorter rides with more hill climbing and longer rides on flatter terrain, and some that combine both hills and distance.
Get Other Exercise
Riding your bike is the best conditioning for a multi-day cycling event, however, demanding schedules and weather are not always conducive to riding outside. Remember: the goal is to gradually gain strength and build endurance, and there are many ways to do this. In addition to riding, you can walk, hike, swim, run, ski, snowboard, dance, lift weights, or take a class like aerobics, cardio kickboxing, step, spinning or yoga. No matter what combination of training you choose to do, it is imperative that you train, as it will help prevent injury, and it will make your long ride much more enjoyable.
Rest
Don’t overdo your workout! Giving your body sufficient time to rest is as important as building strength and endurance. If you are exhausted after a long hard ride, do not try to do another long ride the next day. Let your body rest.
Training Schedule
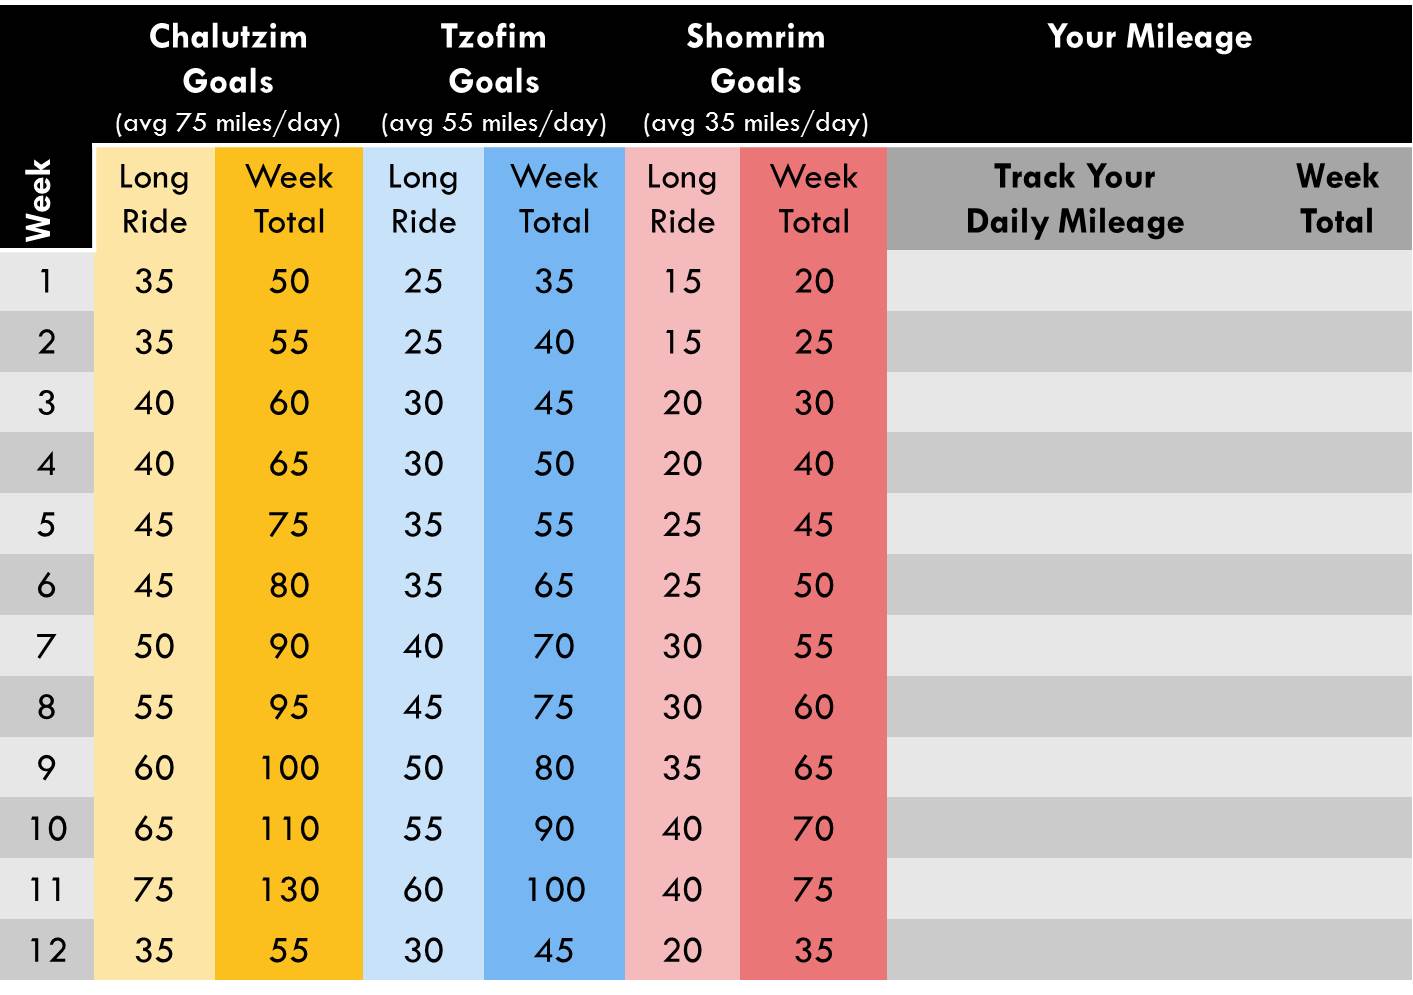
Although you’ll experience some of cycling’s benefits almost immediately (more energy, more restful sleep, etc.), an appreciable increase in fitness will require several weeks of consistent training. To attain the long-term fitness and health benefits of a cycling exercise program you should put in at least 20 to 60 minutes of cycling, three to five times per week, for at least 8 weeks, preferably more. Here is a sample chart to guide you on your training, based on the riding groups of the Israel Ride. If you have more or less than 12 weeks, condense or expand the chart appropriately. Each week, you should attempt one long ride and a few shorter ones. Your mileage each week should increase from the week prior. Keep track of your rides, noting your speed, distance, terrain, and even how much you ate or drank if it helps you fine tune your cycling experience.
Training Chart
Improving Cycling Skills
Training is the best time to focus on improving your cycling skills. That is the best way to help assure that your Israel Ride experience is enjoyable and as safe as possible. When training for a Ride, you should focus on getting you ready for the following:
- Skills: make sure you are comfortable with using your gears, brakes, and general bike handling
- Distance: you should be comfortable riding 75% of the distance required each day
- Endurance: get in plenty of “time in the saddle,” if possible on consecutive days
- Climbing: some portions of the ride are hilly, and you should be prepared for both the ups and downs
- Challenging Conditions: when permitted, we ride rain or shine, so you should be comfortable adapting as needed
- Group riding: try to ride with a cycling group or participate in a local community ride
- Communication skills: good communication, using hand signals, and calling out, are key to keeping group rides safe. It is important to use them throughout the Israel Ride.
Skill Building and Gearing
The more comfortable you are with your bike, the easier your training and, ultimately, your Ride will be. Riders have often commented that after a multi-day ride they have felt “one with the bike” by which they mean they have figured out how to handle the bike to its best ability. Ideally, you should get as much of that handling down before your Ride. This can involve a few things:
Using Gears and Cadence
This is the hardest to master but is one of the most useful tools to learn. On terrain that has rolling hills, knowing when to shift your gears up or down can be key to maintaining your momentum and saving you a lot of energy on longer, hillier rides.
The system of gears on multi-speed bicycles lets you choose different pedaling rates (cadences). Your cadence is the pedal revolutions per minute, and ideally, your cadence should not fluctuate too much when you ride. Skillful cyclists use a brisk, steady cadence of 90-100 pedal revolutions per minute, using the various gears to maintain a constant cadence over varying terrain (you will eventually drop on tough hills, but generally try to maintain a constant cadence).
Spinning in a gear that is too low (making it “easier” to pedal) is tiring and makes for a choppy ride; pushing a gear that is too high (making it “harder” to pedal) is a primary cause of knee problems and the major reason people must stop cycling on a tour. (This is an especially common error but remember, when you’re riding long distances, you don’t want to feel like your legs are working hard!)
At first, a cadence of 90 may seem that you are moving your legs much faster than your comfort level, but if you train to adapt to that pedal speed, you will find it less tiring on a long ride.
Handling
While our rides are on-road, there are still obstacles to avoid, such as glass, sewer grates, and other debris on the road. Knowing how to comfortably handle your bike to maneuver around such road hazards will increase your safety and the safety of riders around you. You should also be comfortable to move your body while on your bike.
To practice, find a painted straight line in a parking lot or a cycle path and follow it as closely as you can. Practice looking back until you can do so without veering to either side. Though not required, a rearview mirror attached to your helmet or handlebars will make checking behind you easier and safer.
Don’t make abrupt steering movements, especially when riding down hills or on slippery surfaces, or your tires may lose traction. Avoid pedaling when you’re leaning into a turn; your pedal or toe clip could catch on the pavement and cause you to fall.
Braking
Whether it is on long descents, going around turns, or stopping at red lights, being confident in your ability to maintain control of your bike is key. Only time in the saddle can help you improve your confidence in these areas.
A cardinal rule of bicycling is to brake before you must, especially on curves and down hills. Brake just before going into a curve; then, if you need to slow down more, brake gently with the rear brake while in the curve. Always apply brakes gradually so you do not skid and so that you do not surprise anyone behind you. Apply right (rear) first, and then ease on the left (front) break, so as not to flip over your handlebars.
If you are new to riding, consider finding a skills building class at a bike shop or cycling group near you.
Watch this video on changing bike gears: Watch Now
Stamina and Endurance
This may be the longest ride you have ever trained for. Even if you have ridden longer distances in the past, cycling for multiple days is a tough challenge. While you should focus your training on skills, speed, and hill climbing and descending, proper endurance training will help you enjoy the whole ride.
The most important part of building stamina is to increase your time in the saddle. This doesn’t mean that you need to go on multiple long rides each week. Rather, you should try to get out on your bike multiple times a week, even if just for a half-hour for a short ride. This will train your body to be ready for the multiple days of cycling.
In addition, you should try to do one longer ride per week, two hours or more, which you should increase in length and difficulty as the ride nears. If you are just starting to train, you do not need to be setting speed records or conquering hills on these rides but should focus on building stamina by riding steadily for long periods of time.
Some riders find it beneficial to track their cycling to see improvement over time. Getting a cycling computer, or speedometer, for the bike can help your training as you track your mileage and speed. A computer with a cadence, or pedal speed meter, can help you keep a consistent tempo in your pedaling, which in turn leads to a smoother ride for your knees and body as a whole.
Watch this video on how to build cycling stamina: Watch Now
Climbs
The Israel Ride covers a wide variety of terrain, including many challenging hills. Most of the days are rolling hills – but sometimes there is more up than down. It is important to train for these hills, both in terms of endurance and cycling technique.
For rolling hills, the key is to attack the hill. Most climbs are preceded by a descent, however short, or a flat stretch. You should use the descent to gain speed and use that momentum to carry you up as much of the hill as possible. The key to this is to pedal fast down the hill, and then to shift your gears as you transition to the climb so you keep up the fast pedal speed as you ascend.
You will find that hills are much more manageable if your momentum has carried you up a portion of the climb. For longer climbs, remember that you can always stop to take a rest – especially if it is hot out and your heart rate is high.
On the challenging climbs, we often have crew cheering at the top or along the climb!
Descents
Along with the climbs, there are many long descents. Remember that you do not need to set any speed records while going downhill – the most important thing is to remain in control at all times. Follow these steps for easy descents:
- Brake early. Don’t wait until you are on the brink of going too fast, but control your speed the whole way down.
- Use both brakes, feathering them as needed. Holding down on your brakes for extended periods of time wears out your brake and does not give you the control you need. Rather, pump your brakes as needed, given them time to rest so they do not overheat. You want to use mostly your rear brake, but pump the front as well for more control. Do not just use your front brake – that can make you stop short and fall.
- Shift your body weight further back on the saddle. If you move your hips back in your seat, your center of gravity changes, and you can control your bike better at the faster speeds.
- Remember to remain calm – relax and take a deep breath while descending. If you feel that you are going to fast, try to slow down, and pull over if needed.
Cycling Safety
Cycling, like any recreational activity, can be dangerous. But, if you follow proper cycling rules and etiquette it can be safe and enjoyable. The Israel Ride attracts cyclists of every age, degree of athleticism and riding styles. Our goal for each of you is to enjoy your ride in a safe and injury-free manner. Your safe riding behavior is one of the most important tools for keeping you and the other
riders safe throughout the ride.
If riding the rain, heat, or in cold weather, you need to be sure that you are prepared. If rainy or at night, make sure that you are visible with lights and reflectors, and are aware of any potential obstacles. If the weather is extreme, be extra aware of your body conditions. Be especially alert when riding in urban areas.
Communication
Since bikes are not equipped with brake or turn lights you must use your arms and hands to indicate your intentions:
- Left arm straight out to the left indicates left turn.
- Right arm straight out to the right indicates a right turn. You can also indicate a right turn with your left arm, held at a right angle pointing up (this is a bit safer than using your right arm because you can keep your right hand on the right (rear) brakes).
- Left arm at a right angle with the hand pointing down indicates slowing and stopping.
When riding with others, you should the extra mile in safety signals by using our hands and vocal chords to do the following:
- Point out road obstacles i.e. rocks, gravel, broken glass, drainage grates, and potholes.
- Always use your arms as pointers and your voice to draw attention to any impending obstacles.
The following CALL OUT signals are encouraged for all cyclists. Never think that someone else is loud enough for the cyclist in front of you to hear him or her, always add your voice and send the message forward or backward – depending on the situation at hand. For example, when coming to a stop with 20 fellow cyclists, ALL 20 cyclists should be calling out, Stopping! This keeps everyone alert.
- “Car back” used when you hear a car approaching from your rear. When you hear a fellow cyclist saying “Car back” you must also say it so the cyclist in front of you can hear it, and on up the line.
- “Car up” used when riding on a narrow roadway and you have a car approaching you.
- “On Your Left” used EVERY TIME you pass another cyclist. Never pass a cyclist on the right.
- “Door” used when riding along parked cars. Watch all cars that are parked and if you see someone in the driver’s seat call out
- “Tracks” used when approaching railroad tracks. Always cross railroad tracks at a 90-degree angle to avoid getting your tires trapped in the tracks.
- “Slowing” used when slowing to make a stop or beginning to pull off the road to stop.
- “Stopping” used after you call out slowing and are ready to come to a full stop. If you are stopping to rest or stretch or even change a flat; it is crucial that you pull completely off the bicycle lane of traffic.
- “Turning” used when making any type of turn and always in conjunction with the appropriate arm turn signal.
You must at all times be aware of your surroundings and alert to all possibilities. On a group ride, there will be other riders on roads alongside vehicles of all sizes. It is crucial that you stay alert and ride smart, predictably and deliberately. Be prepared to stop at any moment. Be aware that each of your actions will dictate how the person behind you, or the automobile beside you, reacts.
Cycling Laws
Laws regarding cycling are different in each city and state, but generally the following is true:
- That a bicycle be considered a vehicle with the same privileges and restrictions as a car.
- That you obey all traffic laws, traffic signals and stop signs.
- That you ride with the traffic – NOT against it.
- That you use hand signals to indicate your intentions.
In general, bicycles have the legal right to share the road on most public highways. Bicyclists must comply with governing laws, and can be ticketed for violations. In the case of children, parents or guardians may be held responsible for any fines.
Riding in the Rain
The weather may be wet while you train, and there is a chance of rain on our rides. Here are some tips for rainy riding:
- Wear proper clothing – Even an inexpensive poncho helps, but have a good rain jacket or even rain pants and shoe covers.
- Make yourself seen – Turn on any lights on your bike, ideally a headlamp in front and a strong blinking light in the back.
- Ride slower – Your brakes will not work as well when wet, increasing the time it takes to stop. Pump your brakes when going downhill to maintain control.
- Watch out for obstacles – Puddles can be deep and cover potholes and other items that can give you flat tires. Wet leaves and other debris can be very slippery and cause you to fall, especially at high speeds or while turning. Be careful of painted white lines – they can be slick.
- Be aware of traffic – Cars have less visibility when it rains, and drivers are less likely to be aware of cyclists.
- Know your limits – Riding in the rain for long periods of time, even if not especially cold outside, can lead to hypothermia. If you feel that your body is losing too much heat, stop riding and find someplace warm.
Heat Safety
There are four different levels of heat illness that can strike an athlete:
- Heat Cramps. You experience muscle spasms, heavy sweating, and fatigue. The body temperature stays normal.
- Heat Syncope. Your blood pressure temporarily drops, resulting in lightheadedness or fainting.
- Heat Exhaustion. Extreme weakness, exhaustion, headache, dizziness, nausea, profuse sweating, cool skin, rapid pulse, and sometimes unconsciousness. Again, your body temperature remains normal.
- Heat Stroke. Headache, nausea, confusion, and a loss of physical control. Your skin is hot and dry, your body temperature extremely high. There can be collapse and unconsciousness, and, in extreme situations, death.
In order to prevent serious injury from the heat:
- Keep yourself fully hydrated. Even water that has become lukewarm will replenish the precious bodily fluids that pour out of a rider’s body on a hot summer day.
- Energy drinks and electrolyte replacements can be useful for sustained exertion and competition.
- Do yourself a favor by buying a good pair of shorts. The padded crotch will protect you against chafing and the Lycra used on most shorts today will allow perspiration to seep away from your skin.
- Protect yourself from the sun. Use sun block, with an SPF of at least 15, on exposed skin. A waterproof brand is more effective against dilution by perspiration. Putting it on 20 to 30 minutes before going out will make sure it penetrates the skin well.
- Remember to bring your water.
- GET USED TO IT – SLOWLY! Few people have a natural knack for riding in the extreme heat, but most can improve with practice. If you’re planning a century ride in July or August, be sure to get in lots of shorter warm weather rides before you tackle the big 100. In short, acclimatize yourself.
- Training is always important, but it is especially valuable for helping your body get accustomed to the heat. Oh, and be sure to drink plenty of water.
From Sports Injury Assessment and Rehabilitation by David C. Reid (Churchill and Livingstone, 1992)
Urban Cycling
- Drive slowly and alertly. On country roads it’s easy to get lost in your thoughts and enjoy the scenery. In the city, be aware of your surroundings – watch out for pedestrians, children, pets, and of course, cars. Assume they are not watching for you.
- Watch out for car doors. “Getting doored” can be very painful. While hugging the line of parked cars may put you just a bit further out of traffic, it puts you at greater risk of cars pulling out. Ideally, bike two to three feet away from parked cars, even if this means you will take up a car lane.
- Take up a lane if needed. In most places (including California and New York) a cyclist has a legal right to occupy a full lane, but be aware many motorists won’t know this. Most of the busier roads have two lanes, so it will be easy for cars to go around you. If there are two lanes and cars are just inching by you on your left, move over into the lane so cars switch lanes instead of almost hitting you.
- At a red light, move to the front of the line. If there are cars stopped at a red light, and it is safe to do so, scoot around and get in front of the cars, just behind the crosswalk. This way, when the light changes, you can go ahead of the cars and position yourself on the road safely.
For more safety tips about biking near cars, check out bicyclesafe.com.
Bicycle Equipment and Clothing
Bike Bags
Whenever you go out biking, you need to carry some small essentials. Every rider should have a small bag on their bike to keep small items such as tool kits, snacks, bandaids, lip balm, and money. There are various bags that can attach under your seat, to your handlebars, or between the frame of the bike. Even on the Israel Ride, when we transport your luggage and have various on-road support, it is still a good idea to carry these things.
Bike Computers and GPS
When training, it is very useful to record your distance and speed, so you can track your progress. There are various bike computers units that provide your speed and mileage. We recommend getting a computer that also measures your cadence or pedal speed. Having such tools can also improve your cycling skills. Each day of a the Israel Ride we provide a turn sheet or basic map which explains the daily route. These will have mileage markers for turns, climbs, or other landmarks along the route. Knowing your distance is key to having an enjoyable ride. You can alsoB get a GPS unit to mount to your bike, and our routes are usually available to download. You can also use websites like ridewithgps.com or mapmyride.com to map out routes that can be downloaded to GPS units. Some smartphone apps can have many of the same features.
Water Bottles
You should always drink copiously when cycling, even if it is not especially hot. When training you should always have at least one water bottle on your bike. If going on a longer ride, you should carry two. Most bikes can fit two water bottle cages on the frame, or you can put a bottle in the pocket of a cycling jersey. If you are uncomfortable handling water bottles while riding, a CamelBak or other hands-free water carrying system is a great way to drink while riding. Remember to drink before you are thirsty.
Tool Kit, Pump, and Tubes
If you are riding frequently, you should expect to have a couple of flats throughout a riding season. Learning to change a flat is not difficult, and we encourage you to take a class at a local bike shop. We recommend carrying two bike tubes while riding, as well as tire levers and a mini pump which can attach to the side of your bike frame. We also suggest carrying a patch kit to fit minor punctures in tires. You can also get a mini-bike tool with hex-wrenches and a mini screwdriver in case you need to adjust anything on the road. To learn to change your tire, click here: https://youtu.be/qLO_HO0kEjs
Lights and Reflectors
In many places it is the law for bikes to have reflectors and lights if cycling in the dark. They are also important for riding in the rain, through tunnels, and in heavily trafficked areas. We suggested having a strong LED light in the front, a reflective red light in the back, and proper reflectors on both wheels.
Helmet
It is mandatory to wear a helmet when riding with us as helmets are the most effective way to prevent a life-threatening accident. Find a helmet that fits snugly, comfortably, and allows maximum visibility. Your local bicycle store should be able to properly fit a helmet for you and sell you a good quality product.
Cycling Jersey
It is highly recommended to invest in biking jerseys to maximize your riding comfort. Biking jerseys come in all styles, from sleeveless to long-sleeved and are made of special fabrics, like thin Lycra which wick the sweat and are extremely breathable. Most come with pockets on the back for you to put lightweight items in, like snacks or your phone. You should invest in a riding jacket or lightweight raincoat in case of weather. Do not wear cotton shirts or sweatshirts which absorb moisture and become extremely uncomfortable.
Gloves
To protect your hands from blisters and slipping on the handle bars, invest in biking gloves as part of your gear. Look for gloves with padded palms for added protection. They also come in handy for wiping sweat from your brow.
Shorts
Choose shorts made of Lycra Spandex. The padded liner is  essential to comfortable riding experience and you wear bike shorts without underwear (to prevent chafing). Riding shorts come in many different styles, including baggy shorts, capri length, and even skirts. Make sure to find what fits best and makes you feel the most comfortable. Do not wear jeans, sweatpants or pants made of cotton as they hold moisture and cannot breathe like modern fabrics.
Socks
Your feet will get very sweaty while cycling so it’s important to have breathable socks. Choose technical fabric socks made for cycling that will wick the sweat away.
Shoes
It is essential to wear comfortable and supportive closed-toed shoes while cycling. For advanced cyclists, try biking shoes or cleats which clip into a receptacle on the pedal. Another great option for beginner and intermediate cyclists is to wear sneakers or running shoes. Even if not “clipped in,” having a cycling shoe with a sturdy bottom will give you more power when you pedal. You can also install plastic “cages” on the front of your pedal which keep your feet in place. Do not wear sandals, boots, flip flops, or open-toed shoes while cycling.
Cold and Rain Weather Layers
When cold or raining, you need to wear layers to keep yourself warm  and dry, but want to make sure that your body can still breathe. For mild weather, you can get Lycra arm warmers or leg warmers. There are also long sleeve jerseys, cycling jackets (with pockets and mesh areas so you don’t overheat), and padded cycling tights. If riding in very cold weather, you can get thicker protection for your hands, feet, and face.
Eating and Drinking
The best diet for a cyclist has been studied endlessly. Even though we are riding more for fun than for performance, it is important to consider a good diet before embarking on your ride. Everyone is different, but you’ll probably find that you’ll need to consume a lot more calories during long rides. Stop and snack frequently while riding to ensure that your body gets a consistent supply of fuel. From before you get on your bike until the end of your ride, the food that you eat will affect your performance on the bike.
Basic Food Intake:
- 65-70% of your calories from carbohydrates, such as whole grain pastas, potatoes, bread, cereal, fruits, and vegetables.
- 15-20% from fats. No more than 10% of your fat should be saturated. Look for foods with healthy fats, such as avocado, olive and canola oil, almonds, flax seeds.
- 10-15% from lean proteins, such as fish, poultry without skin, tofu, tempeh, seitan, lowfat or nonfat cheese or yogurt.
Vegetarian and even vegan diets are great alternatives, as long as you combine your legumes and whole grains to make complete proteins. When cycling, eat and drink constantly, even when you don’t feel hungry or thirsty.
Consuming liquids and solids before, during, and after a ride prevents dehydration and exhaustion; ensures the consistency of your glucose (simple sugar) levels, which feeds your brain and muscles; and greatly increases your ability to perform that day and the next.
Before a Ride
Don’t get on your bike immediately after eating, because the body shifts fluid away from muscles and into the gastrointestinal tract during digestion. You want that energy in your muscles to give you the power to ride. The ideal time for riding after eating is about:
- Half hour after a light snack
- 1 hour after a light meal, heavy snack, or meal replacement drink
- 2 hours after a regular meal
By eating early enough before riding, you will allow enough time for the energy to move from your stomach to your muscles, where you want it. Aim for a pre-ride meal that is:
- High in carbohydrates – whole grains
- Small – according to the amount of food that you feel comfortable eating
- Eaten with fluids.
Sample Pre-Ride Breakfasts
- ½ cup orange juice
- 1 cup dry whole grain cereal or ½ cup dry oatmeal
- 1 medium banana
- 1 cup milk or ½ – ¾ yogurt (fat keeps you feeling full longer, but lowfat or nonfat dairy is also an option)
OR
- whole grain pancakes, topped with fresh fruit, maple syrup or honey
- ½ – ¾ cup yogurt
- ½ cup juice
Try to drink 2 to 3 cups of cool plain water one hour before, and 1 to 2 cups about 15 minutes before starting (you should be urinating frequently, and your urine should be clear).
During a Ride
Once you get going on the bike you will need to continue to provide fuel for your body. Experiment with easy-to-eat items during your training rides but remember not to try anything new on the day of the BIG ride. Find out what you enjoy most and stick with it.
Try different energy bars and sports drinks prior to the ride itself. This is a personal choice. Make sure whatever bar/drink you consume is easily digested and tolerated by your body. In order to avoid a drag in energy, plan to eat about 30 – 60 g of carbohydrates for every hour you are on the bike. What does this mean?
- 1 – 2 bananas (depending on size)
- 1 – 2 energy bars (depending on quantity of carbohydrates)
Other good snacks: energy bars, pretzels, fresh and dried fruit, nuts, and trail mix. Don’t skimp on the carbohydrates, complex carbs will provide a sustained energy source and simple carbs will give you instant energy, which is essential on a long distance ride. Some simple carbs are: juice, white bread, cookies and many granola bars that have sugar as a primary ingredient.
Everyone is different, but you will probably find that you will need to consume a lot more calories during long rides. Stop and snack frequently while riding to make sure that your body gets a consistent supply of fuel. On a long distance ride, you typically burn 300 calories every 10 miles, and it is very important to replace these burned calories.
Do not rely on salads, low calorie food and diet food while on a ride – your body has turned into a calorie burning machine, and you need to feed it!
After a Ride
When you get off the bike for the day, don’t consume a heavy meal in the first hour after your ride. Enjoy a snack or light meal about 30 minutes after riding. This is the time when your muscles are craving nutrients to help repair them for the next ride (or the next day!). Make sure to choose a nutritious snack that contains a good source of lean protein to rebuild muscle and complex carbohydrates for brain energy. Here are a few examples:
- 1 hard boiled egg
- 1 cup of 1 percent milk, or nonfat/ lowfat yogurt
- 1 apple with 1-inch cube of low-fat cheese (or 1 tablespoon peanut or almond butter)
- 2 slices of whole wheat bread with 2 thin slices of turkey (optional mustard)
- 2 slices whole wheat bread with banana and peanut butter or almond butter or hummus
Make sure you are getting enough vitamins and minerals to keep your immune system strong. Eating fresh fruits, vegetables, and whole grains are the best ways to get your nutrients, but you may want to take a multi-vitamin/mineral supplement to ensure you are getting adequate amounts.
Finally, get a good night’s rest so you can get up and do it all again tomorrow morning!
Hydration
Even if you don’t feel like you’re sweating, you’re always losing fluids while riding, and if you don’t replace them you risk dehydration which can lead to very serious problems. If you are not urinating much while you ride, you are not taking in enough liquids. Alternate servings of water with servings of electrolyte replacement drink during strenuous exercise.
You may want to have both a bottle of water and one of energy drink on your bike. Drink not for what you need immediately but what your body needs in reserve.
If you wait until you are thirsty to drink, you have waited to long. Adequate hydration is essential for a healthy ride.
Exercise performance suffers with as little as 2 percent loss of body weight due to dehydration. Drink at least 2 cups of water about 2 hours before you get on your bike. Whether you feel thirsty or not, drink 1/2 cup of fluids for every 10-15 minutes you are on the bike.
Here are a few tips to follow when you are training:
- Weigh yourself before you ride and when you get home. The difference is water loss (sorry but you can’t lose fat that quickly!). Ideally, you should intake enough fluids during the ride so that your body weight remained relatively unchanged. If you did lose weight, consume 2 cups of water for every pound of body weight you lost during the ride. Note how much you did drink and on your next ride increase this amount by the number of cups you drink by that number.
- Decide the best way to drink while on your training rides; try out different water bottles or camel packs. The one you find the most comfortable and accessible is the one that you should always use.
- Check the color of your urine. It should be very light yellow. If your pee is dark, you haven’t been drinking enough. If your urine has little to no color, you are adequately hydrated.
- Make sure you monitor further fluid intake since there is also the risk of over-hydration – hyponatremia. This can also cause fainting because you dilute too much of your system’s ions and electrolytes. Try adding an electrolyte supplement to your water and eat salty snacks.
- Sports drinks! Beverages such as Gatorade or Powerade have electrolytes that otherwise evaporate in your sweat and carbohydrates to keep your energy level up. Experiment with different flavor drinks to find the one that you like the most, the more you enjoy it the more likely you will drink enough. Look for drinks that have sodium (Na) and potassium (K) and are relatively low in calories; however do not choose no- calorie drinks as adequate energy is essential for long rides.
If riding in hot climates, such as on the Israel Ride, you need to compensate by increasing your fluid intake. Don’t let how sweaty you feel be your guide. Continue to drink ½ cup of fluid every 10 – 15 minutes (2 cups/hour). Choose a sports drink (not just water) to ensure adequate carbohydrates and electrolytes. Remember to check your urine and don’t wait until you are thirsty.